Category Archives: Digital signage

My Digital Apprenticeship with Bristol Culture

Hi! My name is Cameron Hill and I am currently working as a Digital Apprentice as part of 

Cameron Hill

the Bristol City Council Culture Team, where I’ll mainly be based at Bristol Museum and helping out with all things digital.

Previously to joining Bristol City Council, I studied Creative Media at SGS College for two years as well as at school for GCSE. A huge interest of mine is social media. Whilst at college I worked with a friend who was a fashion student who sold her creations to create more of a brand for herself. After she came up with the name, I created an Instagram page for the brand and started creating various types of content. Using Instagram stories was a great way to interact with followers. Using different features such as Q&A and polls, it was easy to see what the customers like. Something else we did with stories was showing the ‘behind the scenes’. For example: from picking the fabric, making the item itself and packing the item to be shipped.

As I am writing this it is my first day and so far it has been a lot to take in. One of my first tasks was to upload an image to a folder linked to the various screens around the museum. 

Digital signage not working

Although technology can be temperamental, the first issue we came across was unexpected….

Using my iPhone, I was asked to take an image to upload into the folder but without me realising the phone camera had ‘live photos’ turned on meaning all pictures taken would create small video clips.  After waiting for five minutes or so and the image not appearing we realised that the image was taken in High-Efficiency Image File Format (HEIC). Not knowing what HEIC was I did what anyone in the twenty-first century would do and took to Google.


After a little research, I came across an article in a technology magazine, The Verge stating that this format that Apple has added to iOS 11 would be a problem for PC users. From reading various articles online it is clear that a lot of people have struggled 

when trying to upload their files to PCs and not being able to view and edit it. I am really looking forward to my future working here as part of the Digital Team.


Google Drive for Publishing to Digital Signage

Having taken an agile development approach to our digital screen technology, it has been interesting as the various elements emerge based on our current needs. Lately there has been the need for quick ways to push posters and images to the screens for private events and one-off occasions.

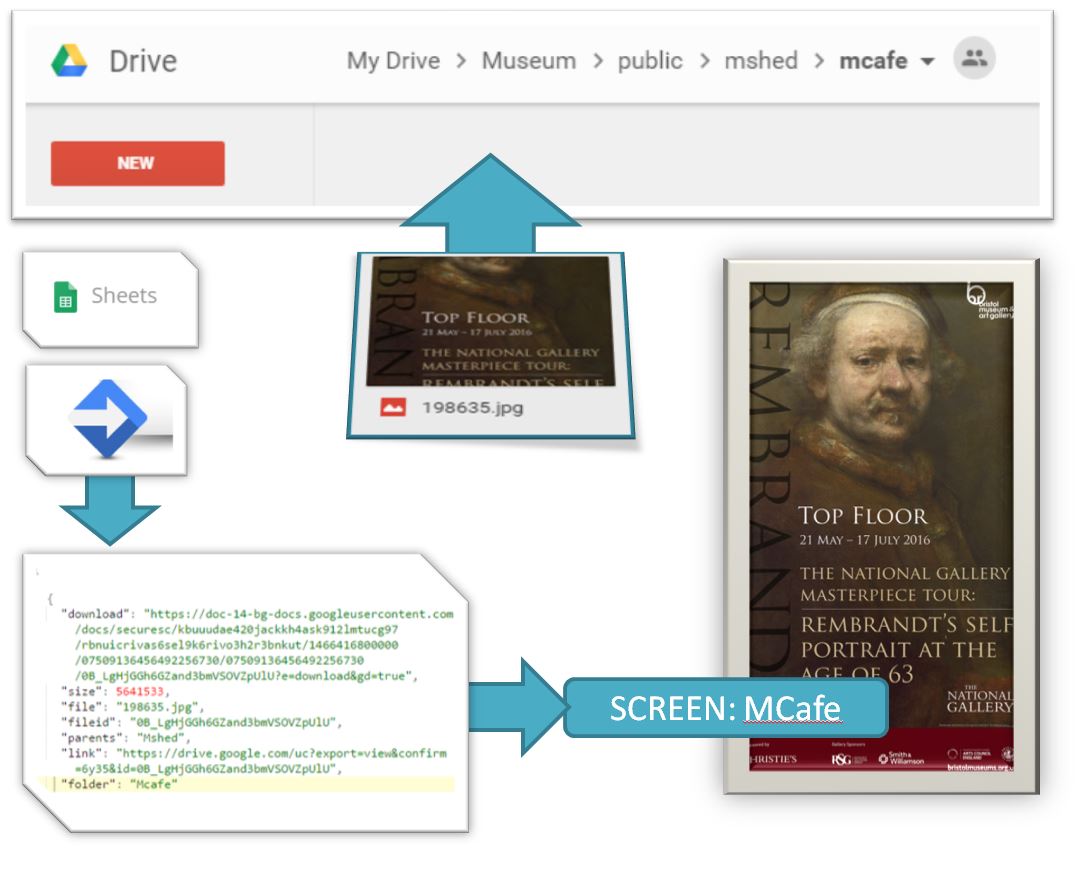
Due to the complexity of the various modes, and the intricacies of events-based data and automatic scheduling it has been difficult incorporating these needs into the system. Our solution was to use Google Drive as a means to override the screens with temporary content. This means our staff can manage content for private events using tables and mobile devices, and watch the updates push through in real time.

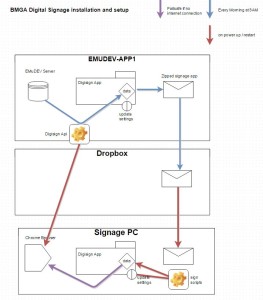
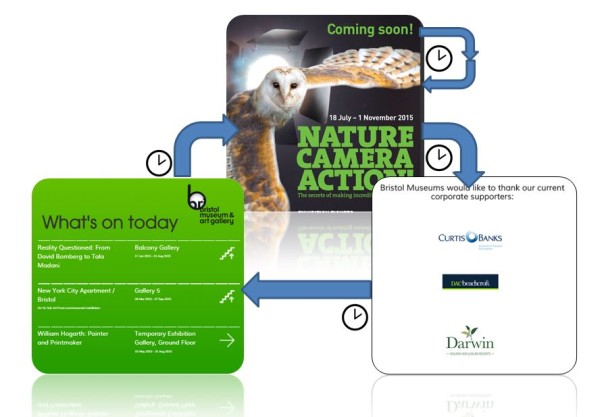
The pathway of routes now looks like this

Untitled Diagram (1)

HOW?

There are two main elements to the override process – firstly, we are using BackboneJS as the application framework because this provides a routing structure that controls the various signage modes. We added a new route at the beginning of the process to check for content added to Google Drive – if there is no content the signs follow their normal modes of operation.

Google Drive Integration

Google provide a nice way to publish web services, hidden amongst the scripts editor inside Google sheets. We created a script that loops through a Drive directory and publishes a list of contents as JSON –  you can see the result of that script here. By making the directory public, any images we load into the drive are picked up by the script. The screens then check the script for new content regularly. The good thing about this is that we can add content to specially named folders – if the folder names match either the venue or the specific machine name – all targeted screens will start showing that content.

Google drive integration

It seems that this form of web hosting will be deprecated in Google Drive at the end of August 2016. But the links we are using to get the image might still work. If not we can find a workaround – possibly by listing urls to content hosted elsewhere in the Google sheet and looking that up.

The main benefits of this solution are being able to override the normal mode of operation using Google Drive on a mobile device. This even works with video – we added some more overrides so the poster mode doesn’t loop till the next slide until after the video has finished – video brings in several issues when considering timings for digital signage. One problem with hosting via Google Drive is that files over 25MB don’t work due to Google’s antivirus checking warning which prevents the files being released.

We’ll wait to see if this new functionality gets used – and if it is reliable after August 2016. In fact – this mode might be usable on its own to manage other screens around the various venues which until now were not up datable. If successful it will vastly reduce the need to run around with memory sticks before private events – and hopefully let us spend more time generating the wonderful content that the technology is designed to publish for our visitors.

You can download the latest release and try it for yourself here.


Anatomy of our Digital Signage Web App

At this stage in the development of our digital signage, we have a working release of the software in the live environment, and we are focussing on training, improvements to the design and data structure for the next version. This post is about the nuts and bolts of how the client-side app works, while it is still fresh.
Mode Schematic

Firstly, it is a single page web application – loaded upon calling index.html from a web browser.  Inside the index.html are just the basics you’d expect. The magic is all controlled via a master JavaScript file called require.js. This library is used to pull together all of the source code in the right order and makes sure files don’t get loaded twice etc. All of the content of the app is loaded and removed via a single content div in the body.

index.html 
(... some bits removed...check the GitHub page for the whole lot)


<html>
  <head><title>BMGA Digital Signage</title>
     <link rel="stylesheet" href="css/styles.css"> 
     <script data-main="js/main" src="js/libs/require/require.js"/>    
  </head>
  <body class="nocursor">
   <div id="mainContent" > </div></div>
  </body>
</html>

The first JavaScript to load up is main.JS. This simple file follows theRequireJS format, which is used to alias some of the code libraries which will get used the most such as JQuery.

//main.js 

require.config({

 paths:{
     jquery:'libs/jquery/jquery-min',
     underscore:'libs/underscore/underscore-min',
     backbone:'libs/backbone/backbone-min', 
     templates: '../templates'
 }
 })

require([

"app"], function(App) {
App.initialize();
});

Next up is main.js. This loads up the code libraries required to start the app, and brings in our first global function – used to close each ‘view’. For a single page app it is really important to destroy any lingering event handlers and other bits which can take up memory and cause the app to go a bit crazy – something that Backbone apps have difficulties with, and otherwise known as Zombie Views. Killing Zombies is important.

//main.js
define([
 'jquery', 
 'underscore', 
 'backbone',
 'router'

], function($, _, Backbone, Router){
var initialize = function(){

 
  Backbone.View.prototype.close = function () { //KILL ZOMBIE VIEWS!!!!
      this.undelegateEvents();
      this.$el.empty();
      this.unbind();
  };
 

   Router.initialize();
 };

 return { 
     initialize: initialize
 };
});

It gets a bit more fun next as we call the backbone ‘router’ – and from now on I’ll only add snippets from the files, to see the lot head to GitHub. The router is what drives navigation through each of the modes that the screens can display. Each route takes its parameters from the url and so this means we can control the modes by appending the text ‘sponsors’, ‘posters’ or ‘events’ to the index.html in the browser.

In addition to the mode we can pass in parameters – which poster to display, which page of sponsors, which venue etc. This was a solution to the problem of how to remember which posters have not yet been shown. If you only wish the poster mode to last 40 seconds, but you’ve got lots of posters – you need to remember which posters come next in the sequence. Additionally as you loop through modes, you need to pass along each parameter until you are back on poster mode. This is why every route has all the parameters for venue and poster.

This slightly convoluted situation has arisen as we are using a page refresh to flip between modes and so without relying on local storage our variables are only around as long as the page lasts

//router.js 

 var AppRouter = Backbone.Router.extend({
 routes: { 
 'sponsors(/venue:venue)(/stick:stick)(/logo:page)(/poster:page)(/machine:machine)': 'sponsors', 
 'posters(/venue:venue)(/stick:stick)(/logo:page)(/poster:page)(/machine:machine)': 'posters', 
 'events(/venue:venue)(/stick:stick)(/logo:page)(/poster:page)(/machine:machine)(/date:all)':'events',

 }
 });

The code for a single route looks a bit like this and works as follows.  We start off with an option to stick or move – this allows us to have a screen stay on a particular mode. Then we look at our settings.JSON file which contains the machine specific settings for all of the signs across each venue. The machine name is the only setting help locally on the system and this is used to let each machine find their node of settings (loop times, etc.).

...
 app_router.on('route:posters', function(venue,stick,logoOffset,posterOffset,machine){
 
 
 var stick = stick || "move"
 var logoOffset=logoOffset||0
 var posterOffset=posterOffset||0;
 
 machineName=machine||'default'
 Allsettings=(JSON.parse(Settings))
 settings=Allsettings.machineName
 settings=('Allsettings',Allsettings[machineName])
 
 
 var venue = settings.location;
 
 if(Globals.curentView){
 Globals.curentView.close()
 }
 
 var venue = venue || "ALL"
 self.venue=venue
 
 var posterView = new PosterView({venue:self.venue,stick: stick,logoOffset:logoOffset,posterOffset:posterOffset,machine:machine,settings:settings,type: settings.eventTypes});
 
 posterView.addPostersFromLocaLFile();
 Globals.curentView=posterView


 }),
....

With all settings loaded, and filtered by machine name and the mode specified – we are ready to load up the view. This contains all of the application logic for a particular mode, brings in the html templates for displaying the content, and performs the data fetches and other database functions needed to display current events/posters…more on that in a bit

Amongst the code here are some functions used to check which orientation the image supplied is, and then cross reference that with the screen dimensions, and then check if that particular machine is ‘allowed’ to display mismatched content. Some are and some aren’t, it kinda depends. When we push a landscape poster to a portrait screen, we have lots of dead space. A4 looks OK on both but anything squished looks silly. So in the dead space we can display a strapline, which is nice, until there is only a tiny bit of dead space. Oh yep, there is some code to make the font smaller for a bit if there is just enough for a caption..etc.   ….turns out poster mode wasn’t that easy after all!

//view.js
 
define([
 'jquery',
 'underscore',
 'backbone',
 'text!templates/posters/posterFullScreenTemplate_1080x1920.html',
 'text!templates/posters/posterFullScreenTemplate_1920x1080.html',
 'collections/posters/PostersCollection',
 'helpers/Globals',
], function($, _, Backbone, posterFullScreenTemplate ,posterFullScreenTemplateLandscape,PostersCollection,Globals){

 var PosterView = Backbone.View.extend({
 
 el: $("#eventsList"),
 
  addPostersFromLocaLFile: function(){ 
 
 var self = this;
 self.PostersCollection = new PostersCollection({parse:true}) 
 self.PostersCollection.fetch({ success : function(data){
 self.PostersCollection.reset(data.models[0].get('posters'))
 self.PostersCollection=(self.PostersCollection.byEventType(self.settings.eventTypes));
 self.PostersCollection=(self.PostersCollection.venueFilter(self.venue));
 self.renderPosters(self.PostersCollection)
 
 $( document ).ready(function() {
 
 setInterval(function(){ 
 
 self.renderPosters(self.PostersCollection)
 if(self.stick=="move"){ 
 setTimeout(function() { 
 self.goToNextView(self.posterOffset)
 }, settings.posterMode_time * 1000);
 }
 }, settings.posterLoop_time * 1000);
 })
 
 }, dataType: "json" });
 
 },
 
 renderPosters: function (response) { 

 if( self.posterOffset>= response.models.length){self.posterOffset=0}
 
 var width = (response.models[self.posterOffset].get('width'))
 var height = (response.models[self.posterOffset].get('height'))
 LANDSCAPE=(parseInt(width)>=parseInt(height))
 ImageProportion = width/height 
 
 if(LANDSCAPE==true){break;}
 self.posterOffset++ 
 }
 }
 
 if(self.orientationSpecific==2){
 
 //enforced orientation lock
 while(LANDSCAPE==false ){ 
 
 if( self.posterOffset>= response.models.length){self.posterOffset=0}
 
 var width = (response.models[self.posterOffset].get('width'))
 var height = (response.models[self.posterOffset].get('height'))
 LANDSCAPE=(parseInt(width)>=parseInt(height))
 if(LANDSCAPE==true){break;}
 self.posterOffset++ 
 }
 }
 
 ImageProportion = width/height 
 if(ImageProportion<=0.7){miniFont='miniFont'}
 if(ImageProportion<=0.6){miniFont='microFont'}
 if(ImageProportion<=0.5){miniFont='hideFont'}
 if(ImageProportion>=1.4){miniFont='hideFont'}
 console.log('ImageProportion'+ImageProportion) 
 self.$el.html(self.PostertemplateLandscape({poster: response.models[self.posterOffset],displayCaption:displayCaption,miniFont:miniFont},offset=self.posterOffset,TemplateVarialbes=Globals.Globals)); 
 

 ....


return PosterView;
 
});

Referenced by the view is the file which acts as a database would do, called the collection, and there is a collection for each data type. The poster collection looks like this, and its main function is to point at a data source, in this case a local file, and then to allow us to perform operations on that data. We want to be able to filter on venue, and also on event type -(each machine can be set to filter on different event types)  and so below you see the functions which do this… and they cater for various misspellings of our venues just in case 🙂

//postercollection.js 

define([
 'underscore',
 'backbone',
 'models/poster/posterModel'
], function(_, Backbone, SponsorModel){

 var PosterCollection = Backbone.Collection.extend({
 
 sort_key: 'startTime', // default sort key
 

 url : function() {
 var EventsAPI = 'data/posters.JSON'; 
 return EventsAPI
 },
 
 byEventType: function(typex) { 
 typex=typex.toUpperCase()
 filteredx = this.filter(function(box) {
 
 var venuetoTest = box.get("type")
 
 if( box.get("type")){
 venuetoTest = (box.get("type").toUpperCase())}
 
 
 return typex.indexOf(venuetoTest) !== -1;
 }); 
 return new PosterCollection(filteredx);
 },


 venueFilter: function(venue) { 

 if(venue.toUpperCase()=="M SHED"){venue = "M SHED"}
 if(venue.toUpperCase()=="BMAG"){venue = "BRISTOL MUSEUM AND ART GALLERY"}
 if(venue.toUpperCase()=="MSHED"){venue = "M SHED"}
 filteredx = this.filter(function(box) {
 var venuetoTest = box.get("venue")
 
 if( box.get("venue")){
 venuetoTest = (box.get("venue").toUpperCase())}
 
 return venuetoTest==venue ||box.get("venue")==null
 }); 
 return new PosterCollection(filteredx);
 
 },
 
 parse : function(data) { 
 return data 
 }

 
 });

 return PosterCollection;

});

Referenced by the collection is the model – this is where we define the data that each poster record will need. One thing to watch here is that the field names match exactly those in the data source. When backbone loads in data from a JSON file or API, it looks for these field names in the source data and loads up the records accordingly (models in backbone speak) . So once the source data is read, we populate our poster collection with models, each model contains the data for a single poster etc.

//postermodel.js


 define([
 'underscore',
 'backbone'
], function(_, Backbone) {

 PosterModel = Backbone.Model.extend({

 defaults: {
 
 category: 'exhibition',
 irn: '123456' ,
 startDate: '01/01/2015' ,
 endDate: '01/01/2015' ,
 venue: 'MSHED' ,
 caption: 'caption' ,
 strapline: 'strapline' ,
 copyright: '© Bristol Museums Galleries and Archives' 
 

 },
 initialize: function(){
 //alert("Welcome to this world");
 },
 adopt: function( newChildsName ){
 // this.set({ child: newChildsName });
 }
 })

 return PosterModel;

});

With the collection loaded with data, and all the necessary venue and event filters applied, it is time to present the content – this is where the templates come in. A template is an html file, with a difference. The poster template contains the markup and styling needed to fill the screen, and uses the underscore library to insert and images into the design.

/*posterFullScreenTemplate_1080x1920.html */

<style>

body{
    background-color:black;
    color: #BDBDBD;
}
  
#caption{
    position: relative;
    margin-top: 40px;
    width:100%;
   z-index:1;
  /*padding-left: 20px;*/
}

.captionText{
    font-weight: bold;
    font-size: 51.5px;
    line-height: 65px;
}

.miniFont{
   font-size:35 !important;
   line-height:1 !important;
}

...

</style>


<div id="sponsorCylcer"> 
 <% 
 var imageError= TemplateVarialbes.ImageRedirectURL+ poster.get('irn') + TemplateVarialbes.ImageSizePrefix
 var imageError= TemplateVarialbes.ImageRedirectURL+poster.get('irn') + TemplateVarialbes.ImageSizePrefix 
 %>
 <div id="poster_1" class="">
 <img onError="this.onerror=null;this.src='<% print(imageError) %>';" src="images/<%= poster.get('irn') %>.jpg" />
 <div id="imageCaption"> <%= poster.get('caption') %><br> <%= poster.get('copyright') %></div>
 </div>


 <% if (poster.get('type').indexOf("poster") !== -1 && displayCaption==true){ %>
 <div id="datesAndInfo">
 <h1>from <%= poster.get('startDate') %> till <%= poster.get('endDate') %></h1>
 </div>

 <%} else{ 
 if ( displayCaption==true){ 

 %>
 <div id="caption">
 <div class="captionText <% if( miniFont!=false){print(miniFont)} %>" > <%= poster.get('strapline').replace(/(?:\r\n|\r|\n)/g, '<br />') %> </div>
 <%} } %>
 </div>
</div>>


 <% if (poster.get('type').indexOf("poster") !== -1 && displayCaption==true){ %>
<div id="datesAndInfo">
<h1>from <%= poster.get('startDate') %> till <%= poster.get('endDate') %></h1>
</div>

<%} else{ 
if ( displayCaption==true){ 

%>
<div id="caption">
<div class="captionText <% if( miniFont!=false){print(miniFont)} %>" > <%= poster.get('strapline').replace(/(?:\r\n|\r|\n)/g, '<br />') %> </div>
<%} } %>

Once the template is loaded, the poster displays, and that’s pretty much job done for that particular mode, except that we want posters to be displayed on a loop, and so the view reloads the template every x seconds depending on what has been set for that machine using the digital signage administration panel. A master timer controls how long the poster loop has been running for and moves to the next mode after that time. Additionally a counter keeps a note of the number of posters displayed and passes that number across to the next mode so when poster mode comes back round, the next poster in the sequence is loaded.

Remarks
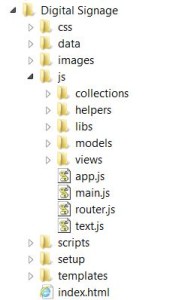
folder structureUsing the require backbone framework for the application has kept things tidy throughout the project and has meant that extending new modes and adding database fields is as hassle free as possible. It is easy to navigate to the exact file to make the changes – which is pretty important once the app gets beyond a certain size. Another good thing is that bugs in one mode don’t break the app, and if there is no content for a mode the app flips to the next without complaining – this is important in the live environment where there are no keyboards in easy reach to ‘OK’ any error messages.


Furthermore the app is robust – we have it running on Ubuntu, Windows 7 [in Chinese], and a Raspberry PI, and it hasn’t crashed so far. Actually if it does its job right, the application architecture  won’t get noticed at all (which is why I am writing this blog)  – and the content will shine through…. one reason I have avoided any scrolling text or animations so far – posters look great just as they are, filling the screen.

Now that our content editors are getting to grips with the system, we are starting to gather consensus about which modes should be prominent, in which places – after all if you have different modes, not every visitor will see the same content – so it there any point in different modes?  Let the testing commence!


Acknowledgements

Thanks to Thomas Davis for the helpful info at backbonetutorials.com and Andrew Henderson for help Killing Zombies.


Developing a Prototype Digital Signage Application

Capture


We are soon to upgrade digital signage across various museum sites, and my role has been to develop the various software mechanisms to gather and display the data for our prototypes. This is a brief post about how our prototype currently works. As a bit of background our legacy signage is based on flash which, although pretty and robust under certain circumstances, has several limitations making it no longer a valid option.

Use Cases

The software would be used by both museum staff wishing to publish events, and users who need to access information about the timings and locations of events. We also have other uses such as those wishing to display messages from sponsors or front of house staff.

Client Side

We chose to implement the signs in html/JavaScript as we already had a working model for doing this which could be adapted, and this would give us the most flexibility and control for future developments. I decided to use the Backbone JavaScript framework to organise the application because of the way it would allow different templates to be used for our different designs, and also because of the way the sign data could be defined and extracted from various sources before being published. This would allow us to be flexible about which systems we use to manage the data – some of these are still in specification, and so we have the option to change data sources quite easily in future. I also used the RequireJS plugin to manage the various other plugins and dependencies we may encounter during development. With this framework and application structure in place before work began it made building the application fairly straightforward and the modular design means we can troubleshoot effectively and adapt the designs easily in future.

Server Side

Because we already use the Events Module of the KE EMu Collections Management Software to manage the exhibition object and multimedia workflow, most of the data we wanted to publish to the signs already exists as event records – so we just needed a way to publish this straight from EMu. I developed a PHP API which returns a JSON list of events (title, description, dates, etc.) which can be accessed over Wi-Fi (hopefully!). To make the system more robust we also wanted the data and images to be held locally on the digital signs, so we also needed another way to send and store the data. I adapted the API to also save the events list to a file which could be stored locally on the signs to achieve this. Similarly for the multimedia this also needed to be saved locally in case of the Wi-Fi going down. To make life easier for staff we have commissioned a new tab in EMu specifically for digital signage – this brings together just the fields used to manage and display sign data, but it also means we can harness records that already exist in the system, in keeping with the ‘Create Once, Publish Everywhere’ ethos.

Additionally I also wanted to open up other options for source data to go to the signs, for staff that would not normally have access to our collections database, so I developed an API in Google application script to allow us to manage and publish data using a Google Docs spreadsheet, if needed.

Update Scripts

We needed a mechanism to transfer the application and its content over to the signs to be held locally. Our digital team were experimenting with Ubuntu for the sign OS so I built the data loader engine using Linux shell scripts. These scripts would download a zipped version of the software on power up, and unzip the files. This would also allow us to carry out upgrades to fix bugs and improve the design during testing. I decided to use a switch, contained in a settings file which could be used to control whether the whole sign application got updated, or just the images and text to be displayed. This way I can update signs individually for testing new releases. These settings would also control which mode the sign was in – so we can specify landscape vs portrait, or which museum building the sign was in so the branding could be adjusted. This settings file would have to live outside of the main application in order for us to use one app for all signs, and this process would need to be documented in the installation instructions.

So, the update scripts had logic for upgrading, or updating the sign data as well as some failsafe code in case of only a partial download or no internet connection. The various update scripts were controlled by a master script which would be set to run each time the sign was powered on, and this would also start Chrome in full screen kiosk mode with the various parameters for local file access and other bits.

Design

I used Chrome Dev tools to build the front end, working from a design supplied by our in house team. As the signs are pretty large and tall the Chrome screen emulator helped to get the proportions right. We decided not to go with a responsive design because tests had already showed problems with css media queries when connecting to digital screens, also there was not any use cases for small screens, and again our framework makes different designs easy to implement in the same app. The main issue so far with the designs is not knowing how many events records there will be on any one day, and so we don’t yet know if we will have to scroll / rotate the records, or if we will have trouble filling all the slots.  For testing though I added some code to beef up the records in case there were not enough to fill each entry. The html was fairly simple – just a table and an image, but this was getting created from the source data using Underscore, a prerequisite of Backbone. The designs also specified images to fade in and out on rotation to represent the events, but not all events would have images, so I used a separate template and Backbone collection for images – this means the system won’t crash if not all events have images, (unlike our legacy flash software).

Further Information

Here’s a link to the latest release of the software on GitHub

Next steps

To work with team digital to refine and test the installation process, and see what our users think.


Running Google Chrome in Kiosk Mode – Tips, Tricks and Workarounds

We are using Google Chrome to publish collections based information and multimedia to the galleries in M Shed using a web application. Here are a few pointers which have helped us get the system up and running

How to run chrome in kiosk mode?

Kiosk screenshot

Google Chrome comes with a built in kiosk mode which makes it load up as a full screen browser and without the usual menu bars and features that would normally let you navigate away from or close down the app. There are various ways you can do this, all of which involve tagging on the –kiosk argument to the command that starts Chrome. N.B. don’t try this out this unless you can CRT-ALT-DEL out of it! The script below can be saved as a .bat file in windows, run from the command line, or the extra arguments can be inserted into the proprties of the Chrome icon used to load up the application.

The following batch script loads up chrome in kiosk mode at a specific page:

start “Chrome” chrome file:///C:/Kiosk2014/CaseLayout.htm?KIOSK=LB-DS-ICT02 –kiosk

So far so good, but there are lots of reasons why this alone is not sufficient for the gallery environment. Here are some problems you may run in to, and the workarounds we have found….

1.) Chrome comes with an array of shortcut key combinations that let you access its hidden features, such as the chrome task manager (shift + ESC) and downloads (Crt + J). This means that if your gallery pcs have keyboards then users may be able to hack their way out of chrome and into the PC or off into the web (why a gallery keyboard would have shift and escape keys is beyond me, but ours do). To prevent this problem needs a minimal amount of JavaScript to catch the key press events and convert them to nothing before they are passed to the browser for interpretation. Here’s what is working for us right now:

$(document).keydown(function(e){ //when any key is pressed

if(e.keyCode == 27||e.keyCode ==18) { // if the key is CTRL or ALT

e.preventDefault(); } }); // do nothing

2.) How to run a website saved on the local file system? By default Chrome wont access scripts in files held locally (although Firefox will). Our kiosk applications are all held locally on each machine as a safety precaution in case of network downtime. To overcome the default behaviour in Chrome add the following argument to the startup command above

–allow-file-access-from-files

So the command we now have is:

start “Chrome” chrome file:///C:/Kiosk2014/CaseLayout.htm?KIOSK=LB-DS-ICT02 –kiosk –allow-file-access-from-files

3.) When the machine is rebooted or you force quit chrome, it restarts with the message “Chrome didn’t’ shut down correctly” in a yellow bar at the top of the screen which must be manually closed. This is unsightly for users and likely to be a common occurrence in the gallery environment. To overcome this we pass another parameter to the start command which causes Chrome to start in incognito mode and prevents the message. So our command is now this:

start “Chrome” chrome file:///C:/Kiosk2014/CaseLayout.htm?KIOSK=LB-DS-ICT02 –kiosk –allow-file-access-from-files –incognito

4.) When the web application crashes for whatever reason, there may be no way for a user to reload the page, or for the page to reload itself automatically. There are many different sorts of crashes that can occur, such as the ‘aw snap’ error where Chrome gives an unsmily face and a link to reload the page or navigate away off into the net. Since fixing some bugs and optimising our code we have not seen this error for a while, but we do have a method to return to the web app if something goes wrong. One method is to use windows task scheduler to close and reopen the web app after a set period of time, and handily we already have most of the code for this in the above command. We set the task to be triggered when the computer is idle for 5 minutes, and make the task run the following code – which kills any running chrome process and restarts the app at the right page:

@echo off

taskkill /F /IM chrome.exe /T

start “Chrome” chrome file:///C:/Kiosk2014/CaseLayout.htm?KIOSK=LB-DS-ICT02 –kiosk –allow-file-access-from-files –incognito

Incidentally this is the exact same script we have in our start up folder so that whenever the computer is rebooted, the application starts.

5.) Despite the above, we were still suffering from a ‘grey screen of death’ every once in a while, which loaded the background page in the right colour, but failed to load anything else. This was probably due to the complexity of the application and its various plugins, but it was very undesirable and almost impossible to replicate in our development environment. What was clear was that when the grey screen happened, none of the JavaScript files for the app had been loaded, rendering it useless and stuck. The workaround we have used for this was to bind an onClick event to the document body which forces a page reload, and to remove this event using JavaScript. This means that if the script files fail to load, the page will reload when someone touches it, and chances are everything will be ok, and if everything is ok – the reload click event is removed and the application functions normally.

So, at the top of the document we have this:

<body onClick=”location.reload()”>

and right before the closing body tag we have this:

<script type=”text/javascript”> $(function() { setTimeout(function () { if($(“#VisitorStoriesHelpText”).length>0){ $(‘body’).attr(“onClick”,””) } }, 1 * 1 * 1000);}); </script>

…..actually we haven’t seen the grey screen of death for a while, but a least it is no longer a show stopper.

So in conclusion – Google Chrome can be run in full screen mode as a gallery kiosk application, but it is not plain sailing, and in the gallery environment expect to see strange things happening. We are not out of the woods yet, and the legacy hardware keeps us on our toes, but at least in terms of the web application we can overcome many of the issues that this solution has presented us with.


*UPDATE*

We have seen on a number of machines some strange artefacts, pixellation and tearing occurring – when coloured spekles appear, or portions of black screen, in some cases the whole machine becomed unresponsive.  This only happens in the live environment and may be something to do with chrome kiosk mode vs windows 7. To solve this I have added another flag to the chrome command – –disable-gpu. With this added the pixellation goes away, it returns when the flag is removed. Time will tell if this solution holds water, or if it puts too much load on the cpu. We still have room for optimisation (using chrome dev tools) so we should be able to reduce the load if problems persist.